Slice of Style – Those Finishing Touches

How do you turn a tile job into a work of art? You add all the right finishing touches, of course!
When working on you tile selections, it’s easy to over look the tiny details that will really pull the job together and make it look complete. Whether it’s capping the tile off to cover the raw edge, making a feature design, framing the mirror or adding storage, details need to be considered in the planning stages. Want that jaw-dropping, polished look? Get every finishing touch well planned!
Here are six suggestions to help you add that touch of polish
1. Add a metal edge


When doing a tile installation you usually end up with a raw edge where the tile ends—either around the surround or on top of the wainscoting running around the room. This raw edge is more noticeable with porcelain, and sometimes can make a job look incomplete.
One option is to hide the edge with a small bead of silicon or grout.
A more popular choice is to use a metal trim. These edges come in a wide array of colours and finishes. This is fairly inexpensive, and really helps keep the job looking clean and neat.
2. Add a stone edge

Metal won’t look right with your tile? Try natural stone! Try to match your stone with a chair or pencil rail. These are usually 12” long and either 5/8” or 2” thick, and, when used, really complete the natural stone look. Browse our wide selection of mouldings here to get an idea of what’s available.
3. Add a matching moulding
Round edges, bevelled edges, bullnose edges, there are trim tiles that fit all tastes! Take a look at some of these options by Jeffrey Court:


Adding a lip or edge such as this can create refinement and polish to your newly installed tile. Jeffrey Court, a new line to Tile + Stone Source, has a wide variety of shapes and colours to offer in both porcelain and natural stone options.
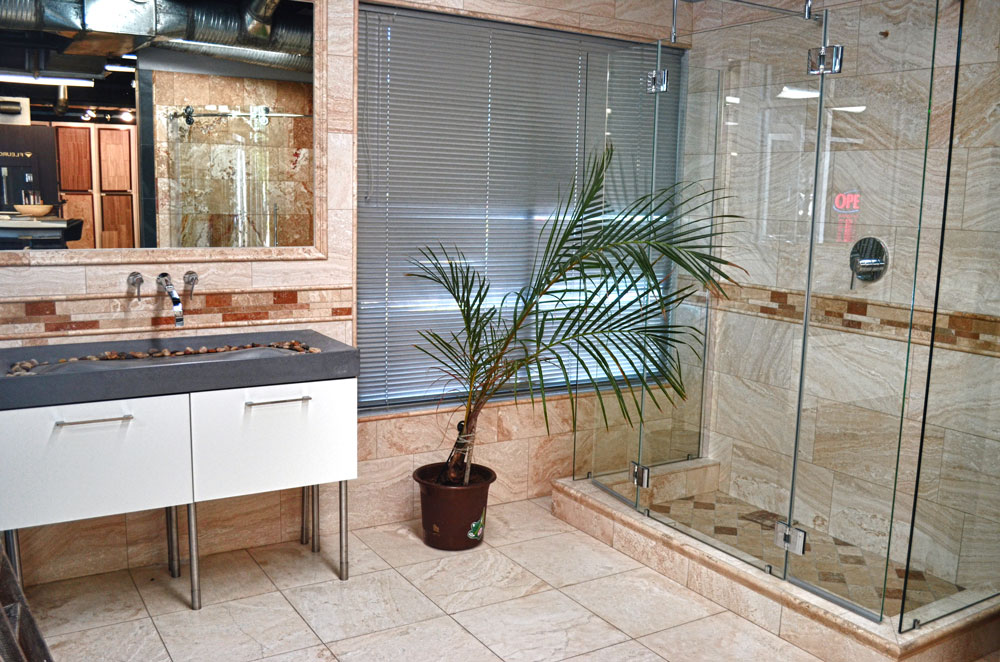
The beauty of Jeffrey Court is the ease with which you can combine tile. Take a better look at the second picture above. In it, eight different tiles from Jeffrey Court’s Chapter 2, Vintage Studio, were combined to create an elegant, finished look. Sash Mouldings were used above the sink. Grand Mouldings were used along the floor. Ramp Edges and Rail Mouldings were used in the shower. The extended backsplash along the wall utilizes both 3×12 and 3×6 bevelled tile, thus creating a seamless edge and perfect brick pattern in the corners (and also eliminating a lot of cutting).
Browse the full Chapter 2, Vintage Studio here, for more ideas of elegant pairings.
4. Create a feature


Make a statement by adding a feature. The possibilities are as endless as your imagination. Mosaics or smaller tiles can be used as the feature. Or, utilize broken tiles to make a custom design (like, even a sea turtle!). Utilize pencil and chair rails to make your feature really stand out.
5. Frame your mirror
Another popular design element is framing out the mirror with the same mosaic used in another area in the bathroom. Even a double frame adds impact to an otherwise boring mirror—transforming it from run-of-the-mille into a custom design. Again, utilize pencil or chair rails to accent your design.
6. Add storage


Adding a shelf, niche or bench is practical for most bathroom projects, and, if it’s forgotten, you will be putting your shampoo and soap on the floor, which really ruins the look of your new, glamorous bathroom.
Niches are extremely easy to install when utilizing either pre-made stone niches, or waterproof niches that can be tiled over. Decide which look you want in the planning stages, to maximize your storage.
Corner shelving is a easy add on and comes in natural stone or glass. Shelves can be added when the tile is being installed, or can be added as an afterthought! Got a lot of shower products? Why not add two shelves!
Browse our Corner Shelves and Niches here to discover our selection of solid, natural stone options for shower storage.
Benches, like niches need to be installed during the waterproofing stage to ensure no water gets trapped inside. Benches can be extremely convenient in steam showers, or they can just be a spot to sit when you shave your legs. They can be custom made to be a small little perch or a large lounge chair depending on your preference.
These are finishing touches that you definitely need to think of before hand but they amp up your space making it look extremely high-end very efficient.


